在silverlight中
在正文開始之後
information for its child animations
因為它用時間線(timeline)來控制
格式如下
oneOrMoreChildTimelines
</Storyboard>
其中的oneOrMoreChildTimelines可以是如下任一或多個對象元素
DoubleAnimationUsingKeyFrames
下面就其中幾個主要的元素作如下演示說明
DoubleAnimation
下面演示的就是矩形(MyAnimatedRectangle)的
<StackPanel
<!
start
<Storyboard x:Name=
<DoubleAnimation
Storyboard
Storyboard
From=
To=
Duration=
AutoReverse=
RepeatBehavior=
</Storyboard>
</StackPanel
<!
Storyboard
Storyboard
From
Duration: 在多少時間內完成上述屬性值的變化;
AutoReverse:是否在vanishes 之後 fade back 到初始狀態;
RepeatBehavior:指示當前animation 不斷反復
<Rectangle MouseLeftButtonDown=
x:Name=
Width=
</StackPanel>
ColorAnimation
下面演示的是myStackPanel背景色在
Loaded=
<TextBlock Foreground=
<StackPanel
<Storyboard x:Name=
<ColorAnimation BeginTime=
Storyboard
From=
</Storyboard>
</StackPanel
</StackPanel>
下面XAML代碼與上面所示的實現效果相同
<TextBlock Foreground=
<StackPanel
<Storyboard x:Name=
<ColorAnimation BeginTime=
Storyboard
</Storyboard>
</StackPanel
<StackPanel
<SolidColorBrush x:Name=
</StackPanel
</StackPanel>
接下來是PointAnimation: 當動畫值的變化(FROM
下面的XAML演示的是EllipseGeometry對象從point(
Storyboard
Duration=
From=
To=
RepeatBehavior=
</Storyboard>
</Canvas
<Path Fill=
<Path
<!
<EllipseGeometry x:Name=
Center=
</Path
</Path>
好了
首先我們建立一個silverlight application
然後我們要去找幾張相冊用的圖片
然後在xaml中加入如下代碼段作為Image元素對相應圖片的引用
MouseLeave=
<Image x:Name=
Canvas
<Image x:Name=
Canvas
<Image x:Name=
Canvas
<Image x:Name=
Canvas
<Image x:Name=
Canvas
</Grid>
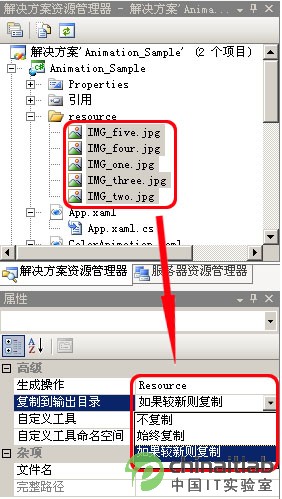
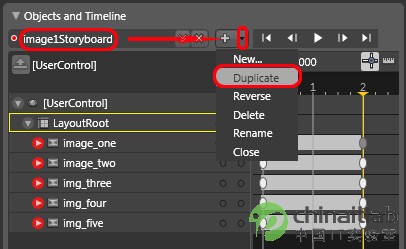
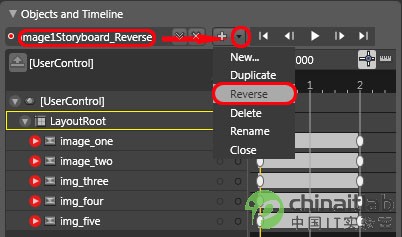
然後在該xaml文件上擊鼠標右鍵

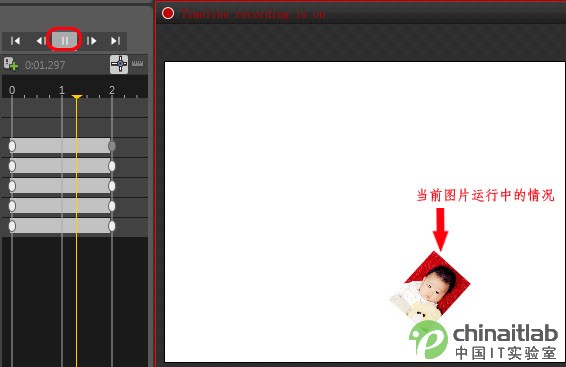
接著拖動當前幀到
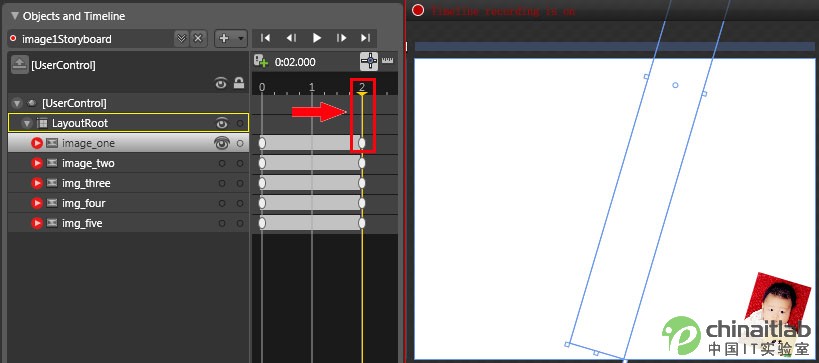
然後對左側的圖片進行
而其最終的值如下圖所示
這裡我們可以通過下圖所示演示一下當前圖片從
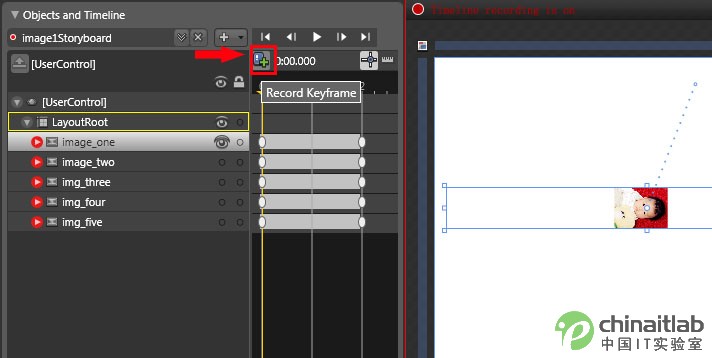
同理對其它圖片進行相類似的操作後
{
image
}
這樣就可以運行該DEMO了
到這裡
這樣我們就得到了一個對展開的
{
image
}
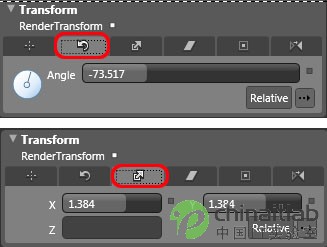
通過Blend工具
From:http://tw.wingwit.com/Article/program/net/201311/12948.html